
Having a thorough family survival plan marks the difference between chaos and safety during emergencies. Recent data reveals that only 29% of Americans practice their disaster plans, making it essential to develop and test these plans regularly.
Key Takeaways
- Stock essential supplies: Ensure you have at least one gallon of water per person per day and maintain a two-week supply of non-perishable food items.
- Establish meeting locations: Designate two specific meeting points outside your home and set up a communication network that includes an out-of-state contact.
- Plan escape routes: Map multiple escape paths from every room and conduct monthly evacuation drills with the goal of getting everyone out in under two minutes.
- Designate a safe room: Select and equip a secure interior room without windows where family members can gather in an emergency.
- Address special needs: Develop customized plans for vulnerable family members, including children, elderly relatives, and pets, with attention to medical needs and supplies.
Practical Steps for a Reliable Survival Plan
I believe preparation starts with the basics. My approach focuses on practical steps that create a reliable emergency response system for each family member. This includes regular drills and clear communication protocols that become second nature through consistent practice. Each family requires distinct considerations based on their living situation, member capabilities, and potential risks in their area.
Maintaining and Updating Your Plan
The success of a survival plan depends on regular updates and adjustments. I recommend:
- Monthly supply reviews: Check food, water, and emergency items to ensure nothing is expired or missing.
- Quarterly communication checks: Test contact numbers and ensure all family members know emergency protocols.
- Immediate updates: Modify the plan whenever family circumstances, such as relocations or new medical needs, change.
This approach creates a dynamic plan that grows and adapts with your family, ensuring everyone stays prepared in any emergency.
Don’t Wait Until It’s Too Late: Essential Items Your Family Needs Today
Building Your Emergency Supply Cache
I’ve learned that starting an emergency supply collection can feel overwhelming, but breaking it down into manageable steps makes it achievable. Water stands as your top priority – you’ll need at least 1 gallon per person daily. For a family of four, that’s 28 gallons for just one week of emergency water storage needs.
Your basic emergency supplies should include:
- A comprehensive first aid kit with prescription medications
- Battery-powered or hand-crank radio for emergency broadcasts
- Multiple flashlights with extra batteries
- Emergency whistle to signal for help
- N95 dust masks for each family member
- Basic tool kit (wrench, pliers, manual can opener)
- Copies of important documents in waterproof container
According to FEMA, I should maintain a two-week supply of non-perishable food items as part of my emergency stockpile strategy. This provides a solid buffer against most disaster scenarios. I’ve found that setting calendar reminders every six months helps me check and rotate supplies before they expire.
The statistics paint a sobering picture – FEMA reports that only 29% of Americans have practiced their family disaster plan. I can’t stress enough the importance of creating a detailed family survival strategy that everyone understands and can follow.
Sanitation and Hygiene Essentials
Sanitation items often get overlooked but they’re crucial. Stock up on:
- Hand sanitizer and soap
- Toilet paper and paper towels
- Garbage bags
- Personal hygiene items
- Household bleach for disinfection
Don’t forget to store these supplies in easily accessible locations and ensure every family member knows where to find them. I’ve found that keeping a main cache at home and smaller kits in vehicles provides the best coverage for various emergency scenarios.

Your Life-Saving Communication Strategy
A reliable communication plan can mean the difference between chaos and coordinated action during emergencies. I’ve seen how quickly standard communication methods can fail—during Hurricane Katrina, cellular networks suffered between 20-100% outages, leaving countless families disconnected at a critical time.
Setting Up Your Emergency Contact Network
I recommend establishing two specific meeting locations outside your home—one nearby and another further out in case your neighborhood becomes inaccessible. For my family, I picked a local church two blocks away as our primary spot and the county library 5 miles out as our backup. Creating an emergency communication strategy involves more than just picking meeting spots.
Each family member needs a physical copy of critical contact information. This should include:
- Phone numbers and addresses for all immediate family members
- Contact details for schools, workplaces, and medical facilities
- Names and numbers for local emergency services
- Meeting point locations and detailed directions
- Out-of-state emergency contact information
Backup Plans and Regular Practice
Your out-of-state contact serves as a central information hub when local lines get swamped. I suggest picking someone reliable who lives at least 100 miles away. While setting up your family survival strategy, remember that communication often breaks down during disasters.
Practice your communication plan twice yearly through different scenarios. I run drills where phones aren’t available, forcing my family to use alternative methods. This helps identify gaps in the plan—like what happens if primary meeting spots become unreachable or if family members get separated during an emergency evacuation.
Consider adding these backup communication tools:
- Two-way radios with extra batteries
- Written messages left in pre-determined spots
- Simple code words that convey specific actions
- Emergency whistles for close-range signaling
- Pre-paid phone cards for landline use
Escape Routes That Could Save Your Family
Getting out fast during an emergency can mean the difference between life and death. The National Fire Protection Association found that due to modern synthetic materials, you now have just 3 minutes to escape a house fire – down from 17 minutes in past decades. That’s why I’ve made creating and practicing multiple evacuation routes an essential part of my family survival strategy.
Creating Your Quick-Exit Strategy
I recommend mapping out at least two escape paths from every room in your house, particularly bedrooms. Each family member should be able to execute an evacuation plan both in daylight and darkness. The NFPA suggests practicing these drills regularly with the goal of getting everyone out in under 2 minutes.
Here’s what I include in my family’s evacuation strategy:
- Clear assignments for each family member (who grabs emergency supplies, who helps younger children, who handles pets)
- Designated meeting spots outside the home and in the neighborhood
- Pet evacuation supplies like carriers and leashes stored in grab-and-go locations
- A ready-to-go emergency kit near primary exits
- Printed maps showing multiple routes out of the neighborhood
- Contact information for local emergency services
I’ve found that monthly practice drills help my family stay sharp and identify potential bottlenecks in our escape routes. This regular practice also helps younger children stay calm during real emergencies since they’re familiar with the process.
For pet owners, I suggest keeping carriers near exits and having pet supplies included in your emergency stockpile. Your pets count on you for their safety, so including them in evacuation drills can prevent panic when seconds count.
I also maintain contact with my local emergency management office to stay current on neighborhood evacuation routes and any changes to emergency protocols. This information helps me adapt our family’s escape plans as needed and ensures we’re ready to move quickly in any scenario.
Remember to establish a communication system for your family in case you get separated during evacuation. Having an out-of-state contact can help coordinate reunification if local communications are disrupted.
Creating Your Family’s Safe Haven
Setting Up Your Safe Room
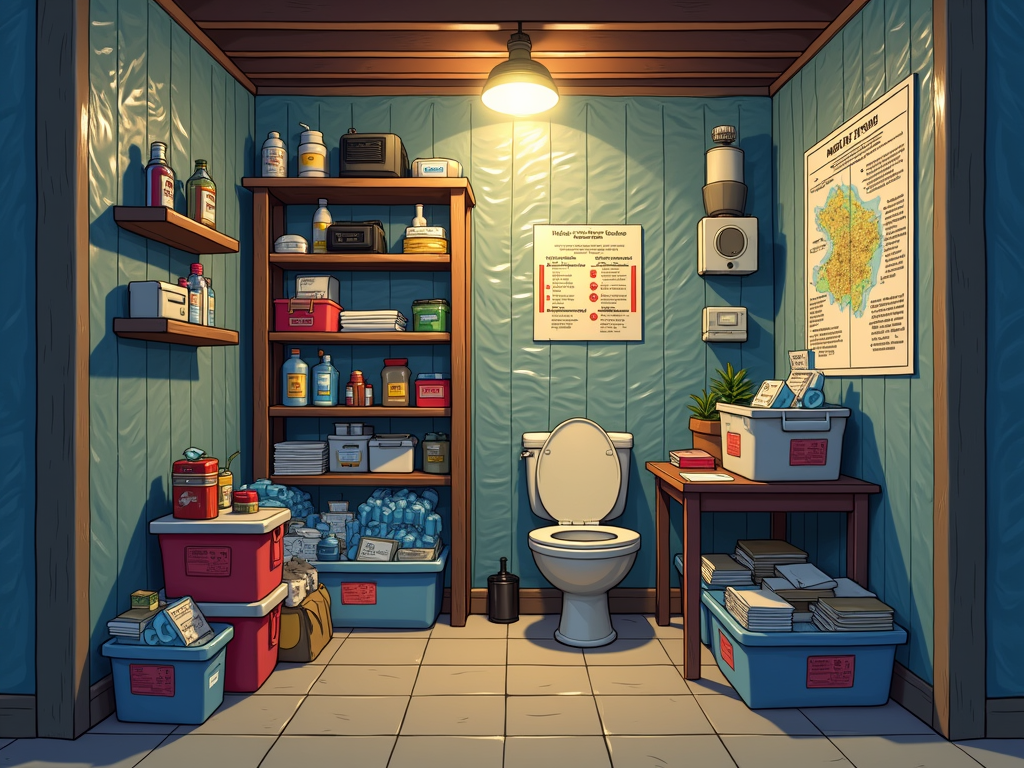
I recommend choosing an interior room without windows as your designated safe room – ideally a basement, bathroom, or large closet. Based on CDC research, a properly sealed safe room can reduce your family’s exposure to dangerous chemicals or contaminants by up to 75%. This makes selecting and preparing the right space absolutely crucial for your family survival strategy.
The process of sealing your safe room requires specific materials and steps. I suggest stocking up on heavy-duty plastic sheeting and duct tape to cover all vents, gaps around doors, and other openings. You’ll want to pre-cut these materials to fit each opening and store them in the safe room for quick access during emergencies.
Stocking and Managing Your Safe Space
Your safe room needs to be stocked with essential supplies that complement your broader emergency stockpile. Here are the critical items to keep in your safe room:
- Battery-powered radio and extra batteries
- Flashlights and chemical light sticks
- First aid supplies and necessary medications
- Non-perishable food and bottled water
- Portable toilet supplies and hygiene items
- Emergency contact information and important documents
Utility control is a critical aspect of safe room preparation. I’ve found that creating a clear map marking the locations of your main utility shutoffs helps during high-stress situations. Take time to learn and practice the proper procedures for shutting off:
- Gas lines
- Water mains
- Electrical panels
- HVAC systems
Make sure to update your emergency communication plan with utility company contact information and keep it readily available in your safe room. This preparation links directly to your family’s ability to respond quickly during various emergency scenarios.
Special Considerations for Vulnerable Family Members
Planning for Those with Special Needs
Family survival plans need specific adjustments for vulnerable members. The Centers for Disease Control reports that individuals with disabilities face a 2-4 times higher risk of injury during disasters compared to the general population. I’ve found that creating an inclusive survival strategy demands extra attention to these special requirements.
For infants and young children, I recommend stocking essential supplies:
- At least a month’s worth of formula and baby food
- Diapers in multiple sizes to account for growth
- Extra sets of weather-appropriate clothing
- Comfort items like blankets or favorite toys
Elderly family members need particular consideration in your emergency supply stockpile. My key recommendations include maintaining a 90-day supply of prescription medications, keeping spare batteries for hearing aids, and storing additional blankets for temperature regulation.
Supporting Pets and Medical Requirements
Pet preparation deserves careful thought in your family evacuation strategy. Each pet needs:
- A 30-day supply of food and medications
- Sturdy carriers or leashes
- Copies of vaccination records
- Familiar items like beds or toys
For family members with disabilities, I suggest creating a support network and keeping backup power sources for essential medical devices. Local emergency management agencies offer special needs registration programs – signing up helps ensure proper assistance during crises. This registration can be vital for those requiring regular medical treatments or using power-dependent medical equipment.
I make sure to include clear, written instructions for any medical procedures or device operations that caregivers might need to perform. These instructions should be stored with your emergency communication plan and updated regularly as needs change.

Making Your Plan Work Through Practice
Regular practice can make the difference between success and failure during a real emergency. I’ve seen firsthand how families who rehearse their emergency survival plans respond faster and more effectively during actual crises.
Essential Practice Components
Your survival strategy needs consistent attention to stay effective. I recommend scheduling comprehensive reviews of your family evacuation procedures every six months. These practice sessions should include:
- Running through your emergency communication protocols with each family member
- Checking and testing all emergency equipment and gear
- Conducting evacuation drills from different locations
- Verifying access to important documents and contact information
- Testing backup power systems and emergency lighting
- Practicing access to your emergency supplies
Kids should participate in these drills through fun, age-appropriate activities. I’ve found that turning practice sessions into games helps children stay engaged while learning critical survival skills. For younger kids, this might mean simple hide-and-seek exercises that familiarize them with safe spots, while older children can help inventory the emergency food and water supplies.
Monthly checks of your bug-out location and supplies help ensure nothing expires or needs replacement. I suggest setting calendar reminders for these reviews – they’re easy to forget but crucial for preparedness. Each practice session presents an opportunity to update your plans based on changing family needs, new local hazards, or lessons learned during drills.
Keep your important documents current and stored in a waterproof, portable container. This includes identification, insurance policies, medical records, and emergency contacts. Store digital copies on encrypted USB drives as backups.
Practice doesn’t need to be perfect – it just needs to be consistent. Each run-through builds muscle memory and confidence, making real emergency responses smoother and more automatic.
Sources:
FEMA (Federal Emergency Management Agency) – “Lessons Learned from Hurricane Katrina”
American Red Cross
NFPA (National Fire Protection Association)
CDC (Centers for Disease Control)
National Council on Disability
Journal of Homeland Security and Emergency Management